
Difference between revisions of "Plastic extrusion machine, Precious Plastic"
Inddigital (talk | contribs) ((by SublimeText.Mediawiker)) |
Inddigital (talk | contribs) ((by SublimeText.Mediawiker)) |
||
| (25 intermediate revisions by the same user not shown) | |||
| Line 6: | Line 6: | ||
{{ProjektImages | {{ProjektImages | ||
|projectimage=precious-p-Contruir la Extructora 16-5 screenshot.png | |projectimage=precious-p-Contruir la Extructora 16-5 screenshot.png | ||
}} | }} | ||
{{ProjektImages | {{ProjektImages | ||
| Line 42: | Line 39: | ||
|contains_pdf_drawings=yes | |contains_pdf_drawings=yes | ||
|technology_readyness_level=6 | |technology_readyness_level=6 | ||
|TechDoc={{ | |Desc= | ||
{{ProjektComponent2 | |||
|cmpimage=precious-p-Contruir la Extructora 13-10 screenshot.png | |||
|cmptitle=Description | |||
|cmpimg= | |||
The DIY plastic extruder, developed by entrepreneur Precious Plastic is here published by OHO, is a revolutionary tool for makers and hobbyists. It allows users to easily create custom 3D printed objects from recycled plastic. The extruder is designed to be easy to use and requires minimal setup. | |||
With the extruder, users can create custom parts for their projects or even make their own filament from recycled plastic. It can be used with a variety of materials, including HDPE, LDPE, PP, PS. The extruder is a great way to reduce waste and create unique objects from recycled materials. | |||
}} | |||
<!-- <div style="margin:20px"></div> --> | |||
<!-- __TOC__ --> | |||
<div style="margin:20px"></div> | |||
{{ProjektComponent2 | |||
|cmptitle=Project developer | |||
|cmpimg= | |||
This project has been analyzed by the OHO technical team, based on an extensive review of similar technical solutions, planned by various entrepreneurs and enthusiasts, taking the work of developer [https://community.preciousplastic.com/academy/build/extrusion Precious Plastic], as the main reference for further developments. | |||
}} | |||
<div style="margin:20px"></div> | |||
{{ProjektComponent2 | |||
|cmptitle=Project goals | |||
|cmpimg= | |||
Among some of the objectives set in the realization of this project, we can mention: | |||
* Make plastic processing devices of great practical utility | |||
* Improve methodologies for the development of Open Source projects | |||
* Manage project certification according to the guidelines established by OHO | |||
* Contribute to the promotion and development of Appropriate Technologies | |||
}} | |||
<div style="margin:20px"></div> | |||
{{ProjektComponent2 | |||
|cmptitle=Target groups | |||
|cmpimg= | |||
This project is mainly aimed at people and small businesses that work with plastic processing in the production of non-industrialized goods, oriented towards community development and sustainable production, among these we can mention: | |||
* Small and medium businesses | |||
* Individuals from the plastic processing and 3D printing | |||
* Non-governmental educational entities | |||
}} | |||
<div style="margin:20px"></div> | |||
{{ProjektComponent2 | |||
|cmptitle=Achievements, promotion | |||
|cmpimage=precious-p-deskfactory.jpg | |||
|cmpimg= | |||
From the publication of this project, by Precious Plastic, an interesting dynamic has been generated on its YouTube channel, where it was widely accepted by technicians and academics interested in building the machine. <br> | |||
Additionally, on the project page, a [https://onearmy.github.io/academy/build/extrusion#-built-by-the-community group of initiatives] is shown where the equipment could be built with some variants. <br> | |||
Thanks to this and other projects, Precious Plastic has carried out [https://community.preciousplastic.com/events various events], making known to the world the feasibility of building these equipment, being an active organization in the dissemination of Appropriate Technologies. | |||
}} | |||
<div style="margin:20px"></div> | |||
{{ProjektComponent2 | |||
|cmptitle=Sustainable development goals | |||
|cmpimage=wikipedia-Sustainable_Development_Goals_logo.svg.png | |||
|cmpimg= | |||
This project can help advance several [https://en.wikipedia.org/wiki/Sustainable_Development_Goals Sustainable Development Goals] (SDGs) in various ways: | |||
* Goal 1: No poverty: Products that can be produced with locally available resources support the development of local enterprises and thus contribute to the creation of new jobs and income. In perspective, an alternative form of industrialisation is sought, which is based on the local production of technologies. This applies especially to the production of goods in cooperatives or small companies, which are dedicated to products for the satisfaction of basic needs, such as in the fields of agriculture, food processing, house construction, etc. | |||
* SDG 9: Industry, Innovation and Infrastructure - Individuals can contribute to the development of sustainable infrastructure and technologies that promote responsible consumption and production. This promotes innovation and helps build a more sustainable future. | |||
* SDG 13: Climate Action - By recycling plastic waste and turning it into usable products, individuals can reduce the need for new plastic production, which contributes to greenhouse gas emissions. This helps to mitigate climate change and promote a more sustainable future. | |||
* SDG 14: Life Below Water - Plastic pollution is a significant threat to marine life, and by reducing the amount of plastic waste that enters our oceans, we can help protect marine ecosystems and promote a healthy and sustainable ocean. | |||
* SDG 15: Life on Land - Plastic pollution also affects terrestrial ecosystems and wildlife. By recycling plastic waste and reducing the amount of plastic waste that ends up in landfills or littering our landscapes, we can help protect land-based ecosystems and promote a more sustainable future. | |||
Overall, the design and manufacture of a DIY recycled plastic extruder can contribute to several Sustainable Development Goals, promoting sustainable infrastructure, responsible consumption and production, climate action, and the protection of our natural ecosystems. | |||
}} | |||
<div style="margin:20px"></div> | |||
{{ProjektComponent2 | |||
|cmptitle= Technical data | |||
|cmpimg= | |||
<div> | |||
<table width="100%" style="border: solid 1px !important;"> | |||
<tr style="visibility: collapse;"> | |||
<td width='50%'></td> | |||
<td width='50%'></td> | |||
</tr> | |||
<tr style="border: solid 1px !important;"> | |||
<th style="display: table-cell;"> Feature | |||
</th> | |||
<th style="display: table-cell;"> Detail | |||
</th></tr> | |||
<tr> | |||
<td style="display: table-cell;"> Dimensions | |||
</td> | |||
<td style="display: table-cell;"> 500 x 1020 x 1120 mm | |||
</td></tr> | |||
<tr> | |||
<td style="display: table-cell;"> Screw size | |||
</td> | |||
<td style="display: table-cell;"> 26 x 600 mm wood auger | |||
</td></tr> | |||
<tr> | |||
<td style="display: table-cell;"> Voltage | |||
</td> | |||
<td style="display: table-cell;"> 380V | |||
</td></tr> | |||
<tr> | |||
<td style="display: table-cell;"> Nominal Power | |||
</td> | |||
<td style="display: table-cell;"> 1.5 kW minimum. | |||
</td></tr> | |||
<tr> | |||
<td style="display: table-cell;"> Output Speed | |||
</td> | |||
<td style="display: table-cell;"> 40-140 r/min | |||
</td></tr></table> | |||
</div> | |||
}} | |||
<div style="margin:20px"></div> | |||
{{ProjektComponent2 | |||
|cmptitle= Additional features | |||
|cmpimg= | |||
<div> | |||
<table width="100%" style="border: solid 1px !important;"> | |||
<tr style="visibility: collapse;"> | |||
<td width='50%'></td> | |||
<td width='50%'></td> | |||
</tr> | |||
<tr> | |||
<th style="display: table-cell;">Feature</th> | |||
<th style="display: table-cell;">Detail</th> | |||
</tr> | |||
<tr style="border: solid 1px !important;"> | |||
<td style="display: table-cell;">PID Controller</td> | |||
<td style="display: table-cell;">0-400 Degree</td> | |||
</tr> | |||
<tr style="border: solid 1px !important;"> | |||
<td style="display: table-cell;">Solid State Relay (SSR)</td> | |||
<td style="display: table-cell;">2-24 V</td> | |||
</tr> | |||
<tr style="border: solid 1px !important;"> | |||
<td style="display: table-cell;">Thermocouple</td> | |||
<td style="display: table-cell;">K or J type</td> | |||
</tr> | |||
<tr style="border: solid 1px !important;"> | |||
<td style="display: table-cell;">Band heater</td> | |||
<td style="display: table-cell;">35x45mm and 40x45mm </td> | |||
</tr> | |||
</table> | |||
</div> | |||
}} | |||
|TechDoc= | |||
{{ProjektComponent2 | |||
|cmptitle=Plastic extrusion machine - all drawings | |cmptitle=Plastic extrusion machine - all drawings | ||
|cmpimage=precious-p-Extrusion_all_p1.jpg | |||
|cmpfile1=Extrusion all.pdf | |cmpfile1=Extrusion all.pdf | ||
}}{{ | }} | ||
<div style="margin:20px"></div> | |||
{{ProjektComponent2 | |||
|cmptitle=Plastic extrusion machine - bill of materials | |cmptitle=Plastic extrusion machine - bill of materials | ||
|cmpfile1=bill of materials Machines - Extrusion.pdf | |cmpfile1=bill of materials Machines - Extrusion.pdf | ||
}}{{ | }} | ||
<div style="margin:20px"></div> | |||
{{ProjektComponent2 | |||
|cmptitle=Plastic extrusion machine - CAD-files | |cmptitle=Plastic extrusion machine - CAD-files | ||
|cmpimage=precious-p-view1.jpg | |||
|cmpfile1=Extrusion V2.0 CAD.iges | |cmpfile1=Extrusion V2.0 CAD.iges | ||
|cmpfile2=Extrusion V2.0 CAD.sat | |cmpfile2=Extrusion V2.0 CAD.sat | ||
| Line 55: | Line 194: | ||
|cmpfile4=Extrusion V2.0 CAD.f3d | |cmpfile4=Extrusion V2.0 CAD.f3d | ||
|cmpfile5=Extrusion V2.0 CAD.smt | |cmpfile5=Extrusion V2.0 CAD.smt | ||
}} | |||
<div style="margin:20px"></div> | |||
{{ProjektComponent2 | |||
|cmptitle=Other technical notes | |||
|cmpimage=precious-p-Contruir la Extructora 14-4 screenshot.png | |||
|cmpimg= | |||
<h3>Tips & tricks while making</h3> | |||
* Alignment of the motor and couplings is key, any misalignment could cause future wear and tear. To do this we recommend drilling holes into the plates and attaching them to the motor. Align and then weld the plate in position to the frame. | |||
* Any bolts used should be used in tandem with locking nuts to prevent them from loosening over time. | |||
* When choosing a gearing system bear in mind that the extrusion screw applies lateral pressure into the gearbox. Avoid using linear systems that don't have a back plate such as motors found in garden mulchers. | |||
* Choose bearings that can handle directional load (such as a tapered bearing) | |||
* Installing a VFD with this machine makes using it a dream. | |||
}} | |||
<div style="margin:20px"></div> | |||
{{ProjektComponent2 | |||
|cmptitle=Assembly instructions | |||
<!-- |cmpimage=oho-spe-test1.png --> | |||
|cmpimg= | |||
Below is a diagram with the assembly sets and pieces, which can be seen at [https://onearmy.github.io/academy/build/extrusion#-built-by-the-community this link] | |||
<!-- <div class="mw-collapsible mw-collapsed" id="mw-customcollapsible-div1" data-origID="mw-customcollapsible-div1"> | |||
<div style="text-align:right;"> | |||
<i class="mw-customtoggle-div1" style="color:#1b599a;">View exploded</i> | |||
</div> | |||
[[File:precious-p-assembled.jpg|frameless|none|1000px]] | |||
</div> | |||
<div class="mw-collapsible" id="mw-customcollapsible-div1" data-origID="mw-customcollapsible-div1"> | |||
<div style="text-align:right;"> | |||
<i class="mw-customtoggle-div1" style="color:#1b599a;">View assembled</i> | |||
</div> | |||
[[File:precious-p-ass-ins2.jpg|frameless|none|1000px]] | |||
</div> --> | |||
<div class="mw-collapsible" id="mw-customcollapsible-div1" data-origID="mw-customcollapsible-div1"> | |||
<div style="text-align:left;"> | |||
<i class="mw-customtoggle-div1" style="color:#1b599a;">Zoom in</i> | |||
</div> | |||
<div class="res-img col-auto col-sm-auto col-md-auto col-lg-5 col-xl-5"> | |||
<div style="border: solid;">[[File:precious-p-assembled.jpg]]</div> | |||
<div style="margin:20px"></div> | |||
<div style="border: solid;">[[File:precious-p-nozzle.jpg]]</div> | |||
<div style="margin:20px"></div> | |||
<div style="border: solid;">[[File:precious-p-barrel.jpg]]</div> | |||
<div style="margin:20px"></div> | |||
<div style="border: solid;">[[File:precious-p-holder.jpg]]</div> | |||
<div style="margin:20px"></div> | |||
<div style="border: solid;">[[File:precious-p-hopper.jpg]]</div> | |||
<div style="margin:20px"></div> | |||
<div style="border: solid;">[[File:precious-p-frame.jpg]]</div> | |||
<div style="margin:20px"></div> | |||
<div style="border: solid;">[[File:precious-p-box.jpg]]</div> | |||
</div> | |||
</div> | |||
<div class="mw-collapsible mw-collapsed" id="mw-customcollapsible-div1" data-origID="mw-customcollapsible-div1"> | |||
<div style="text-align:left;;"> | |||
<i class="mw-customtoggle-div1" style="color:#1b599a;">Zoom out</i> | |||
</div> | |||
<div style="width: 810px;"> | |||
<div style="border: solid;">[[File:precious-p-assembled.jpg|frameless|none|800px]]</div> | |||
<div style="margin:20px"></div> | |||
<div style="border: solid;">[[File:precious-p-nozzle.jpg|frameless|none|800px]]</div> | |||
<div style="margin:20px"></div> | |||
<div style="border: solid;">[[File:precious-p-barrel.jpg|frameless|none|800px]]</div> | |||
<div style="margin:20px"></div> | |||
<div style="border: solid;">[[File:precious-p-holder.jpg|frameless|none|800px]]</div> | |||
<div style="margin:20px"></div> | |||
<div style="border: solid;">[[File:precious-p-hopper.jpg|frameless|none|800px]]</div> | |||
<div style="margin:20px"></div> | |||
<div style="border: solid;">[[File:precious-p-frame.jpg|frameless|none|800px]]</div> | |||
<div style="margin:20px"></div> | |||
<div style="border: solid;">[[File:precious-p-box.jpg|frameless|none|800px]]</div> | |||
</div> | |||
</div> | |||
}} | |||
<div style="margin:20px"></div> | |||
{{ProjektComponent2 | |||
|cmptitle=Tests, practical applications | |||
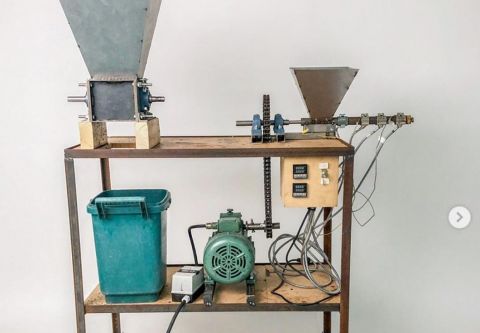
|cmpimage=precious-p-Contruir la Extructora 16-5 screenshot.png | |||
|cmpimg=For this project, after its construction, the [https://www.youtube.com/watch?v=p4NoY33-Tfo&t=795s complete start-up process] of the extruder is shown, carrying out the following stages: | |||
* Barrel Preheat | |||
* Material dosing | |||
* Spindle drive | |||
* Process parameter setting | |||
* Extraction of extruded material | |||
}} | }} | ||
|Materials={{ProjektMaterials | |Materials={{ProjektMaterials | ||
Latest revision as of 05:05, 21 April 2023
Project data
|
Category: Extrusion machines URL (first publication): https://community.preciousplastic.com/academy/build/extrusion License: CC BY-SA 4.0 Organization: Precious Plastic Project status: Active Certification status: In process
Maturity of the project: production / full product
Contains PDF-drawings: Yes CAD files are editable: Yes Assembly instructions are published: Yes Bill of materials is published: Yes
no no
|
|


Project details
Description

The DIY plastic extruder, developed by entrepreneur Precious Plastic is here published by OHO, is a revolutionary tool for makers and hobbyists. It allows users to easily create custom 3D printed objects from recycled plastic. The extruder is designed to be easy to use and requires minimal setup.
With the extruder, users can create custom parts for their projects or even make their own filament from recycled plastic. It can be used with a variety of materials, including HDPE, LDPE, PP, PS. The extruder is a great way to reduce waste and create unique objects from recycled materials.
Project developer
This project has been analyzed by the OHO technical team, based on an extensive review of similar technical solutions, planned by various entrepreneurs and enthusiasts, taking the work of developer Precious Plastic, as the main reference for further developments.
Project goals
Among some of the objectives set in the realization of this project, we can mention:
- Make plastic processing devices of great practical utility
- Improve methodologies for the development of Open Source projects
- Manage project certification according to the guidelines established by OHO
- Contribute to the promotion and development of Appropriate Technologies
Target groups
This project is mainly aimed at people and small businesses that work with plastic processing in the production of non-industrialized goods, oriented towards community development and sustainable production, among these we can mention:
- Small and medium businesses
- Individuals from the plastic processing and 3D printing
- Non-governmental educational entities
Achievements, promotion

From the publication of this project, by Precious Plastic, an interesting dynamic has been generated on its YouTube channel, where it was widely accepted by technicians and academics interested in building the machine.
Additionally, on the project page, a group of initiatives is shown where the equipment could be built with some variants.
Thanks to this and other projects, Precious Plastic has carried out various events, making known to the world the feasibility of building these equipment, being an active organization in the dissemination of Appropriate Technologies.
Sustainable development goals
![]()
This project can help advance several Sustainable Development Goals (SDGs) in various ways:
- Goal 1: No poverty: Products that can be produced with locally available resources support the development of local enterprises and thus contribute to the creation of new jobs and income. In perspective, an alternative form of industrialisation is sought, which is based on the local production of technologies. This applies especially to the production of goods in cooperatives or small companies, which are dedicated to products for the satisfaction of basic needs, such as in the fields of agriculture, food processing, house construction, etc.
- SDG 9: Industry, Innovation and Infrastructure - Individuals can contribute to the development of sustainable infrastructure and technologies that promote responsible consumption and production. This promotes innovation and helps build a more sustainable future.
- SDG 13: Climate Action - By recycling plastic waste and turning it into usable products, individuals can reduce the need for new plastic production, which contributes to greenhouse gas emissions. This helps to mitigate climate change and promote a more sustainable future.
- SDG 14: Life Below Water - Plastic pollution is a significant threat to marine life, and by reducing the amount of plastic waste that enters our oceans, we can help protect marine ecosystems and promote a healthy and sustainable ocean.
- SDG 15: Life on Land - Plastic pollution also affects terrestrial ecosystems and wildlife. By recycling plastic waste and reducing the amount of plastic waste that ends up in landfills or littering our landscapes, we can help protect land-based ecosystems and promote a more sustainable future.
Overall, the design and manufacture of a DIY recycled plastic extruder can contribute to several Sustainable Development Goals, promoting sustainable infrastructure, responsible consumption and production, climate action, and the protection of our natural ecosystems.
Technical data
| Feature | Detail |
|---|---|
| Dimensions | 500 x 1020 x 1120 mm |
| Screw size | 26 x 600 mm wood auger |
| Voltage | 380V |
| Nominal Power | 1.5 kW minimum. |
| Output Speed | 40-140 r/min |
Additional features
| Feature | Detail |
|---|---|
| PID Controller | 0-400 Degree |
| Solid State Relay (SSR) | 2-24 V |
| Thermocouple | K or J type |
| Band heater | 35x45mm and 40x45mm |
Technical documentation

Plastic extrusion machine - bill of materials
Plastic extrusion machine - CAD-files

Other technical notes

Tips & tricks while making
- Alignment of the motor and couplings is key, any misalignment could cause future wear and tear. To do this we recommend drilling holes into the plates and attaching them to the motor. Align and then weld the plate in position to the frame.
- Any bolts used should be used in tandem with locking nuts to prevent them from loosening over time.
- When choosing a gearing system bear in mind that the extrusion screw applies lateral pressure into the gearbox. Avoid using linear systems that don't have a back plate such as motors found in garden mulchers.
- Choose bearings that can handle directional load (such as a tapered bearing)
- Installing a VFD with this machine makes using it a dream.
Assembly instructions
Below is a diagram with the assembly sets and pieces, which can be seen at this link
Zoom in


Zoom out
Tests, practical applications

For this project, after its construction, the complete start-up process of the extruder is shown, carrying out the following stages:
- Barrel Preheat
- Material dosing
- Spindle drive
- Process parameter setting
- Extraction of extruded material
+ General Reviews 
Reviews
| Pos. | Qty. | Part Name | Part code | Part Type | Specifications | Review Status | Show All Comments | |
|---|---|---|---|---|---|---|---|---|
| 0 | Plastic extrusion machine | |||||||
| 1 | 1 | Framework | ||||||
| 1.1 | 2 | Tube 30x30x3 | Steel, L=960 | |||||
| 1.2 | 2 | Tube 30x30x3 (3) | Steel, L=500 | |||||
| 1.3 | 4 | Tube 30x30x3 (4) | Steel, L=800 | |||||
| 1.4 | 4 | Tube 30x30x3 (2) (1) | Steel, L=35 | |||||
| 1.5 | 2 | Tube 30x30x3 (5) | Steel, L=440 | |||||
| 1.6 | 1 | Tube 30x30x3 (6) | Steel, L=900 | |||||
| 1.7 | 4 | Flat 30x3 | Steel, L=100 | |||||
| 2 | 1 | Hopper | ||||||
| 2.1 | 2 | Front | Steel, Sheet 1 mm | |||||
| 2.2 | 2 | Flat 20x3 | Steel, L=90 | |||||
| 2.3 | 2 | Side (1) (1) | Steel, I Sheet 1mm | |||||
| 3 | 1 | Barrelholder | ||||||
| 3.1 | 2 | Tube 30x30x3 (2) | ||||||
| 3.2 | 1 | Tube 30x30x3 (1) | Steel, L=260 | |||||
| 3.3 | 1 | Tube 30x30x3 | Steel, L=120 | |||||
| 3.4 | 1 | Angle 30x3 | Steel, L=120 | |||||
| 3.5 | 1 | Angle 30x3(1) | Steel, L=100 | |||||
| 3.6 | 1 | Angle 30x3 (2) | Steel, L=100 | |||||
| 3.7 | 1 | Barrelholder bearing shaft | ||||||
| 4 | 1 | Barrel | ||||||
| 4.1 | 1 | Tube 34x26 | Steel, L=530 | |||||
| 4.4 | 2 | Flat 30x4 | Steel, L=120 | |||||
| 5 | 1 | Nozzle | ||||||
| 5.1 | 1 | Nozzle flow adjuster 1" BSPfitting Female | Steel | |||||
| 5.2 | 1 | Nozzle filter, Filter Alu R.30 | Aluminum, L=4 | |||||
| 5.4 | 1 | Nozzle screw | Steel, M12xl0 | |||||
| 5.5 | 1 | Round 30 | Steel, L=55 | |||||
| 5.6 | 1 | M8x30 | Steel | |||||
| 6 | 1 | Electronic metal box | ||||||
| 6.2 | 1 | Cover | Steel, Sheet 150x200x2mm | |||||
| 6.4 | 1 | Rear | Steel, 150x200x2mm | |||||
| 6.5 | 1 | Side | Steel, 200x200x2mm | |||||
| 6.6 | 1 | Top | Steel, 150x200x2mm | |||||
| 6.7 | 4 | Bracket | Steel, Flat 30x3 -45' | |||||
| 6.8 | 1 | Side (2) | Steel, 200x200x2mm | |||||
| 6.9 | 1 | Bottom | Steel, 150x200x2mm | |||||
| 7 | 1 | Electronic sheets | ||||||
| 7.1 | 1 | Rear(1) | Steel, 150x200x2mm | |||||
| 7.2 | 1 | Side (3) | Steel, 200x200x2mm | |||||
| 7.3 | 1 | Cover (1) | Steel, Sheet 150x200x2mm | |||||
| 7.4 | 1 | Bracket (1) | Steel, Flat 30x3-45' | |||||
| 7.5 | 1 | Bottom (2) | Steel, 150x200x2mm | |||||
| 8 | 1 | Buy parts | ||||||
| 8.1 | 1 | Motor | Around 70 RPM | |||||
| 8.2 | 1 | Bearing | UCFL204 | |||||
| 8.3 | 1 | Drill | 26 x 600 MM (make sure if fits the tube) | |||||
| 8.4 | 1 | Electronics | ||||||
| 8.5 | 2 | PID Controller | 0-400 Degree | |||||
| 8.6 | 2 | SSR | 2-24 V | |||||
| 8.7 | 2 | Thermocouple | Type K | |||||
| 8.8 | 3 | Bandheater | 35x45MM | |||||
| 8.9 | 1 | Bandheater | 40x45 MM | |||||
| 8.10 | 1 | Power switch | 220V | |||||
| 8.11 | 1 | Led indicator | 220V | |||||
| 8.12 | 5m | Powercord | ||||||