Technical drawings
From OHO - search engine for sustainable open hardware projects
Guidelines
The process of drawing up the plans is preferably carried out in the same program in which the CAD models were created (Inventor, SolidWorks, AutoCAD...). In this program, a drawing file [.idw or similar] must be created, from which the following pdf files must be generated:
- General assembly views.
- Single general exploded view.
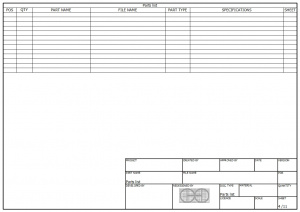
- Complete part list.
- Sub-assembly1 (SE1) views.
- Single explosion view for SE1 (if applicable).
- Part 1 views from SE1.
- Part 2 views of SE1.
- ...
- Sub-assembly2 (SE2) views.
- Single explosion view for SE2 (if applicable).
- Part1 views of SE2.
- Part2 views of SE2.
- ...
- ...
- In the Technical Drawings, standard parts are not included.
- View sheets may include orthogonal views, isometric views, cuts, details, annotations, etc.
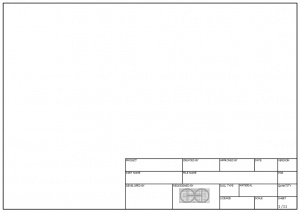
- The established formats must be used.
- The content of the application form must be written in English and must contain the following fields:
- PROJECT -> Name of the Project established or approved by OHO.
- CREATED BY -> abbreviation of the full name and surname of the developer (e.g. M. Serrantes).
- APPROVED BY -> abbreviation of the full name and surname of the director, e.g. D. Jaeger.
- PART NAME -> Name of the previously defined part or assembly, in case of the sheet for Parts list, enter Part List.
- PART CODE -> Part Code, already defined in the Parts list.
- DOCUMENT TYPE -> Depending on the content of the sheet, it can be: "PART" "ASSEMBLY" or "PARTS LIST".
- MATERIAL -> Indicate the material of the part, usually Steel C45, Steel A36.
- LICENCE -> Specify the license of the project, established or approved by OHO, e.g. "CERN-OHL".
- FILE NAME -> Filename of the part or assembly present in the sheet.
- VERSION -> Version number of the project, the first version is 1.0.
- QUANTITY -> Total quantity of the part or assembly in the sheet, within the complete assembly.
- SCALE -> Scale used by default in the sheet, specify in views if there are enlargements.
- SHEET -> Number of the sheet in the complete pdf in sheet/sheet format.
- DATE -> Date of last edition.
- DEVELOPED BY -> Organisation that developed the project, may include logo.
- REDESIGNED BY -> In case there are modifications in the design, place OSEG and your logo.
- The sheet corresponding to the 'Part List' contains the same fields already defined in the Parts list of the Project, with the following exceptions:
- The 'PART CODE' field is replaced by 'FILE NAME'.
- The 'SHEET' column is included.


